Here's to bank holidays! Gives me the chance to do a long overdue post :)
The house is coming along quite well and we are anxious to keep moving so we can get closer to moving in. In the last month we've gotten a fair amount done but the best part was that we had some WONDERFUL friends come help us!!! We passed all of our initial inspections, which was huge! There were 4 rough in inspections - plumbing, electrical, mechanical (HVAC), and framing. Once we passed all of those we were able to put the insulation in, then we had to get the Insulation Inspection. When we passed that, we finally got the go-ahead to put in the sheetrock...yay!!!
I'll let the pictures do the talking below... :)

Tilden and Will hooking up the plumbing for the guest shower. Will had to raise the shower head after he stood under it and of course it wasn't tall enough... :)

This is the main plumbing for the guest sink and it also shows the pipes between the walls. It's amazing everything that's hidden in those walls!

Here is where the double vanity will go in the master bath. You can see the plumbing for both sinks, then the shower to the left of that.

And of course, the HVAC...here is some of the new ductwork for the upstairs heating and air. After we pulled all that old stuff out, we have now managed to fill the attic back up!

The air handler for the downstairs AC. All hooked up and ready to go!

One of the new vents we ran to the new master closet.

This is the wall in the kitchen where the range and hood will be. Since this is a totally different kitchen layout than before, we had to run a new gas line for the stove. Let me just say...this was very interesting! First, our HVAC guys ran it and charged us an arm and a leg, then the plumber Will has helping us accidentally knicked it when he was drilling a hole for a different pipe. Unfortunately, this is not one of those lines that you can just cut and patch....you have RE-RUN the entire line. So instead of paying the HVAC guys another arm and a leg, we went to Home Depot, bought the copper pipe for $75, and then the two of us actually managed the run the whole copper pipe in about an hour and a half. We had to be super careful because the copper can't kink at all and it was about 30 feet worth of piping to run. Phew!

You can see the copper pipe running above the pex water line - this is part of the copper that we had to re-run.

Here is Will taking a pipe cutter and cutting the leftover copper from the main line.

Using one of our many fancy new tools to finish off the end of the copper pipe.

Finished! Now we just need the stove.... :)

I thought this was interesting to include. This is in the attic where you can see the lines running up to the solar panels. Kinda neat.
To say that I've learned a lot about plumbing would be a vast understatement. I have learned a TON!!! Here's a cool trick though - if you suspect a leak in a connection but you can't find it, cover it with suds and if there's a leak it will start to bubble up. Leak detection 101!
Now.....DRUM ROLL......

The tub filler WORKS!!!! We turned it on for the first time and it looked great! Watch below for the video...
Let me preface the next string of photos by saying....we have AMAZING FRIENDS!!!! We are so lucky and could not thank these folks enough! Please come down for many more trips to Bojangles :)
Thank you Nick, Trey, Mike, and Mallory for a fantastic weekend that was so fun and VERY productive!

We kinda teamed up into 3 groups of 2 for the weekend. Trey and Mike were in charge of insulation and they did an awesome job. Here they are measuring and cutting the insulation.

Not sure if Mike's saying he's done here or what....??

Trey and the beautiful kitchen wall.

Will and Nick were another team and one of the many jobs they worked on was laying the cement board in the bathrooms. This first required cleaning the floors, then mixing mortar in a bucket and spreading it out on the bathroom floor with a trowel. See Will above.

Then lining up the cement board and putting it in place.

Lining up another piece - this time with the help of Trey. And some onlookers....myself included, haha.

To level off the space between the pieces, you use a special tape (see Nick) that connects the two pieces, then you cover it with more mortar.

One of the jobs that Mallory and I (obvious team here) did was digging up a plant from an area next to the house that we needed to level off and moving it to a better location. However, our "better location" had some SERIOUS roots/stumps in the ground, so we had to enlist Nick to help us get around the stump.

I promise I do actually work and don't just take pictures.... haha

The fantastic girl team! Mallory and me.

Trey and Mike continuing to do an awesome job insulating. This time in the master bathroom.

Nick - need that breather huh?

Not exactly sure what Trey is doing here, but it's a great shot of the upstairs all insulated.

YAY!!! Great group pic - this one's a framer for once the house is finished!


Will and Nick adding some insulation to the downstairs powder room - no light.

Another one of our jobs - finding all the holes in the wall and cutting out pieces that are squared off so the drywall guys can easily patch them. Here's Mallory being really hardcore with the multimaster tool!

Not only does the cement board go on the floor, but it also goes on the wall wherever we will be laying tile. So again, some odd faces from the help, but you can see where the tile will be in the master bath.

I went through and took all the extra insulation and stuffed as much as physically possible into all the space underneath and around the tub. I'm guessing this tub might make a lot of noise when it gets filled, so the more insulation the better. Hopefully due to my stuffing job, we won't hear it so much in the kitchen below.

I'm telling you - there is literally a whole roll of insulation around that tub!

The master shower had some interesting holes that needed to be cut into the cement board...here's Will going to town on those holes.


And it's all up! See, the big whole on the left will be a great ledge for shampoo, etc. then the two holes in the middle are for the shower lever and a body spray thing. Pumped about that!

I came over one night and found that all the sheetrock had been delivered!! Honestly, I had no idea the individual pieces of sheetrock were so big!!

All the mud, screws, tape, etc. Ready to hang!
Now....here are a few before and after pictures!!


Kitchen


Kitchen


Living Room - that sheetrock is about to disappear.


Boiler Room


Master Bath - Notice the green sheetrock. This is special moisture-resistant sheetrock for bathrooms. Also - the window was replaced the same day, so notice the new glass blocks that are in the shower!


Master Closet - with new glass block window as well!

Scraps...

One of the guys hanging the guest bathroom walls.

Our sheetrock guys in the guest bath - lotta dust!

Patches in the dining room

More patches in the garage.

Our buddy Carlos, the mason, getting ready to take our window out and replace it with glass blocks.

The old window

The new window!! See the bathroom and closet pictures above for the inside view. They look so good!

More helpers!! Tilden putting some boards back up now that we don't have to mess with the AC anymore.

Smile! However, this was right when my camera battery died, so I had some more pictures of Andrea and my dad, but I'll have to save those for the next post because they're on my other camera.

Once all the sheetrock was hung, then the guys had to go back through with the tape and mud. Starting to look good though!

Check out those stilts! It's amazing how these guys walk on these things like it's the easiest thing in the world.

OK - looks like an odd picture. But that little black box in the bucket had the loudest Spanish music coming out of it! So I had to get a pic to remember it :)

Our buddy on stilts - this is the super cool face :)

More fixes. We accidentally ran the hood vent in the wrong place.....we didn't realize this until our cabinet guy, Charles, caught it. So....we moved it.

Old vent

Cutting the hole for the new vent

Please notice our brand new shop vac! It is not that colorful anymore....a bit of dust goes a long way.

This is the part where I learned how to solder copper piping! First...you take this great tool and basically grind down the edges of the fittings so they fit together well.

Then you rub a product called "flux" on to the edges. This looks like a lotion, but it makes the solder spread evenly in the joint.

Then you add the torch....this is where it gets fun! haha - this was our first attempt at soldering copper fittings. Then we realized this torch was not doing the trick and had to go buy a bigger one.

Once the copper is hot enough, you add the solder and melt it around the fitting to create a seal.

Then we added the fitting onto another copper pipe on the water heater and prayed for no leaks. Our prayers were not answered.....so we did this like 4 times....sweet life.

This is the main water line for the house. We unhooked the hose and hooked up the main water line for the first time! Then again prayed for no leaks....more bad luck.

Will soldering another copper pipe. Notice the propane torch upgrade :)

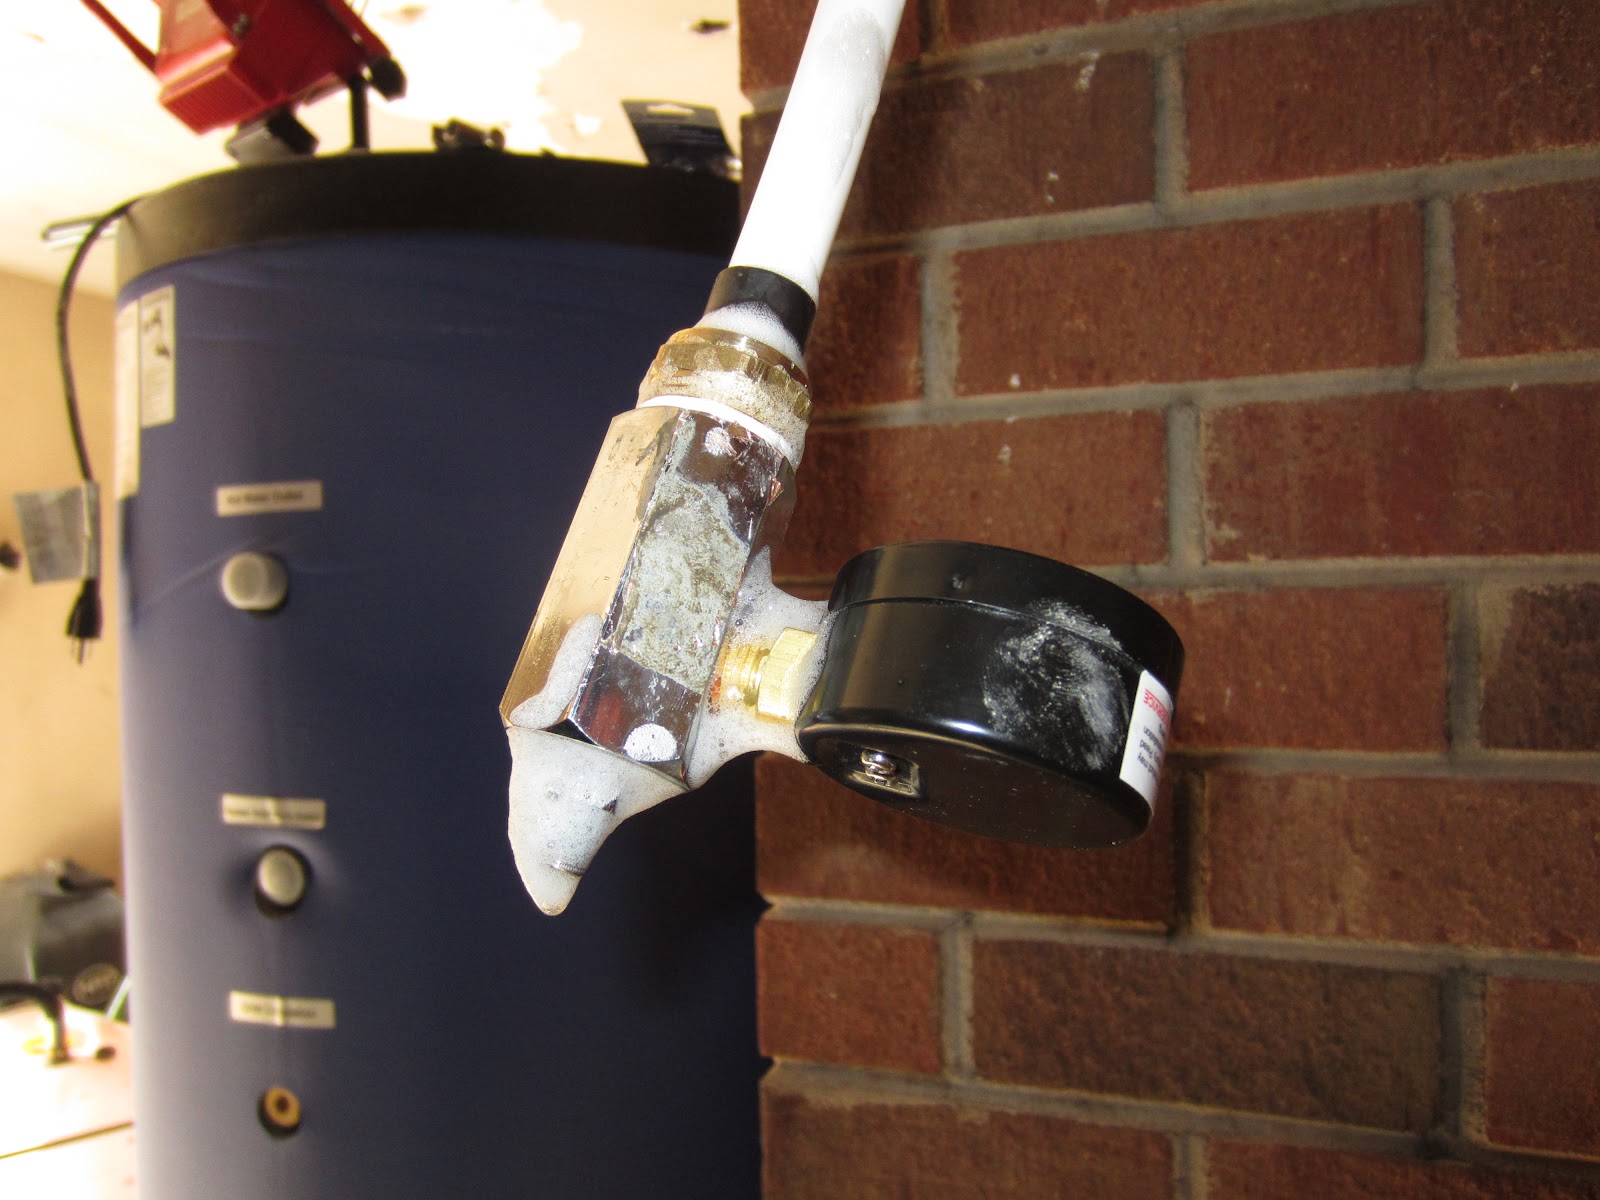
This little guy is on the solar hot water heater. Basically, the solar hot water can sometimes be SO hot, it has to be mixed with cold water to get the right "hot" temperature. So in the picture above, you can somewhat make out the H on the bottom (where the hot comes in), the C on the top (where the cold comes in) and the M on the right (where the "mixed" hot and cold comes out). This is still super hot, so it feeds the hot water for the rest of the house.

Another view of the hot water coming out of the hot water heater (notice the "danger" picture on the left).

Our drywall guys in the garage. They sprayed this texture mixture on all the garage walls to make it even. It looks great now!

In the process of spraying. Hard to see though.

OK - this is not house related, but Will's sister Elizabeth got the CUTEST little puppy and I just couldn't resist posting a few pics....meet Etta :)

Etta taking after Sally. She wants to be JUST like her!

We brought Sally in this weekend and she was SO good. Here she is hanging out in the truck bed while we worked inside.

After we hooked all the water lines up and fixed all the leaks we could see, we could tell there was still a leak "somewhere" based on the fact that the water meter was still spinning. Since we couldn't see it anywhere it could only mean there was a leak in the concrete slab...not good. So we had to call some specialists in to help us identify where in the concrete slab this leak was. They found it and marked it for us, then we headed to Home Depot to rent a massive jack hammer! Here's Will going to town with the jack hammer.

And Grainger helping us out, taking his turn with the jack hammer.

In the process of trying to find the leak in the hot water pipe, we accidentally found the cold water pipe....hit it....and it EXPLODED!!! If you can't tell....there is water EVERYWHERE! I only wish I had the video running on this one....haha, it would have been hilarious.

Here's the "x" where the leak is, and then our hole with water all in it after we hit the pipe.

Wiping down the walls.

The start of our hole.

I had to jump in and give it a try :)

Here you can see the hot water pipe on the left and the cold water on the right. That little tool on the left is the pipe cutter that you spin around and tighten until it cuts it.

Here is the pipe with the leak. You can see the teeny tiny hole on the left side of the pipe....our nemesis! And it's interesting b/c the copper has the green on it due to the leak. The cold water pipe just to the right of this was not exposed to leaking water and the copper was still in good shape. Until we hit it of course.

Soldering the replacement copper

All done! Now...these had to be re-done a few times (typical) because the fittings were leaking. But we got it all worked out in the end. Only bad news is the water meter is still spinning.....so there's another leak in the slab! The leak detection guys are over there right now trying to find the other leak. When they do, we'll be back to Home Depot renting the jack hammer and back to tearing up the slab. Oh the joys of renovating.... :)

Final project this past weekend - putting up MDF around the AC ductwork. This hides the silver mini-ducts in the upstairs closet.

This big one is in the front guest bedroom. Here you can see the MDF on the left and the ductwork in the corner.

All hidden

And one to end on.....SNOW!!!! :)
Thanks for checking out our blog! Come back again for the next post. Will and I are ready to move in soon! So we're working fast to finish.....